Sunday, 13 March 2011

Exercise: Object in different positions in the frame

In this exercise I look at the impact of the position of an object in the frame. I have presented the images captured in order of preference, with my favourite image at the top. As the images become more uncomfortable, awkward and less desirable I have described why I feel this is the case.

MIDDLE LEFT

In this image the subject is prominent and ones eye is drawn immediately to it. The placement of the subject lends a balanced and comfortable feel to the image. There is enough mass to the background such that even with its lack of interest the background is able to balance out the image with its extremely prominent subject.

MIDDLE

This image feels comfortable and balanced. However, this image feels somehow static and lacking in design. Ones eye is drawn immediately to the centre of the frame and there is no movement from there. I do feel this is a successful image. However, this image is less enjoyable to me than the first.

TOP LEFT

This image feels awkward. The subject is in a corner and so the background has a great deal of mass to it and in my view takes on too much importance in the composition. The background somehow overpowers the subject and the image feels unbalanced. I do feel this image is dynamic and exciting, even more so than the first image. However, the balance in the first image is more attractive to me than the movement and dynamic nature of this image.

FAR LEFT

As in the previous image the background overpowers the subject and the image is unbalanced.


I am finding it very difficult to articulate why I find this image less pleasing than the previous images. At first inspection this image should have been second in my order of preference. However something about it just does not work for me. I think this might be because the subject is slightly too close to the centre and therefore there is enough mass to the water on the left side such that the image becomes unbalanced and awkward without the dynamic nature of the previous two images to help it.


This image feels unbalanced and gives me a sense of claustrophobia. The subject is overpowered from above, below and to the right. It seems the subject is being pushed up against the left side of the frame and has nowhere to run. This composition could be of value in a scene where the photographer wants to project claustrophobia or awkwardness. In this scene this was not my intention and the image does not work.


My comments relating to this image are exactly as for the previous image. There is a sense of claustrophobia, imbalance and awkwardness in this image.

This exercise was valuable in helping me to understand the concept of balance better. In addition to this I can see that there will be times when I can use an awkward composition to support an image and emphasise the emotion being conveyed.

Exercise: Fitting the frame to the subject

I spent a long time thinking about an interesting subject for this exercise.  I was asked to select a subject that is compact in shape,  clear in appearance, and affords me the opportunity to take a photograph of it from close by and far away.  I realised that the term compact does not necessarily mean small and is used here to describe a subject that has defined borders and an identifiable shape.

I decided that the London City Hall would make a great subject for this exercise while also providing a visually stimulating and interesting subject to capture.  Unfortunately I was forced to conduct this exercise in relatively bad weather with failing light and without the use of a tripod.  I do plan to return to this location when the sky is more interesting however overall I am pleased with the results I achieved.

Results
The four photographs required for this project consisted of taking photographs with no consideration to composition, with the subject fitting the frame as tightly as possible, a close up photograph without any of the edges of the subject showing and a photograph with the subject occupying 1/4 or less of the frame.  There results of this exercise are below.

No consideration for composition
Tight fit to frame
Close up
Subject 1/4 frame or less
I was extremely surprised at how different each of the photographs above looks.  I realised now that as I view a scene I have preconceived ideas with regards to how a photograph of that scene will look.  By looking at the subject through the viewfinder and at different distances and angles I realise that a wealth of creative possibilities are available that I had not considered when first surveying the scene.

I created several crops from the photographs I took to explore further possibilities.  I have presented these crops below.

I have cropped the above photograph with a landscape orientation and have tried to eliminate unnecessary areas including the foreground and on the left side of the frame.  I have placed City Hall in the top right of the frame and included Tower Bridge in the background.  I feel this is an aesthetically pleasing crop which has areas of interest in the foreground as well as in the background.

Here I have chosen a square crop.  While this shape of crop may be required for certain types of frame or placement I found that this crop did not work for the scene that I was capturing for this exercise.  The curving shape in the foreground is abruptly cut off on the left side of the frame and this leaves this interrupts the flow of the photograph.

The above crop is vertical or portrait.  I chose to place the subject in the top of the frame.  This frame is not pleasing to me for two reasons.  Firstly the curving and flowing structure in the foreground is abruptly cut off and interrupted on the left side of the frame.  Secondly this composition does not include significant features of this scene including Tower Bridge in the background.

This panoramic crop aims to include as much areas of interest from within the scene as possible while eliminating as much of the rather unintersting sky as possible.  In order to fit the main subject, City Hall, in I chose to rotate the frame.  This angled view gives the scene a dynamic feel.  I find this crop to be visually pleasing.  This is a crop I would never have thought of trying before conducting this exercise.


For this final crop I have chosen another panoramic view.  However, this time the scene was not rotated and this results in much of the main subject being eliminated.  I feel this crop does not work for this scene as the missing part of City Hall results in the photograph feeling incomplete and far less interesting than the previous crop.

In summary this exercise taught me to view a subject from a variety of distances and angles.  My favourite crop was the penultimate one.  This was particularly pleasing as that is a crop I would never have attempted in the past.

Exercise: Panning with different shutter speeds

Panning involves following the movement of a subject with the camera. A fast shutter speed can freeze motion while a slow shutter speed can result in an exposure in which the movement of the subject is apparent.

For this exercise I once again strived to pick a subject out of the norm. I decided to elicit the help of my twins and photographed one of them as she flew past me on a swing.  I also decided to try the exercise on passing cars.  My primary reason for doing this was to have one set of photographs where the movement was in a single direction.

Results
In order to take these photographs I set my camera to the Shutter Priority mode (Tv) and allowed the camera to choose the aperture needed to correctly expose the picture. All photographs were taken with my Canon 50d camera body with the Canon 17-55 2.8 IS lens attached.  Please click on any of these photographs in order to see a larger version.  Each photograph is labelled with the associated exposure settings and this is far easier to read on the enlarged view of the photographs.


Capturing my daughter as she hurtled past on a swing was challenging.  The movement I had to track was an arc.  I had to be close to her in order to prevent the frame of the swing obstructing my view and this meant that the movement was also rather fast.  It was a cold day and so I could not afford to spend too much time shooting for a perfect capture.

I am extremely pleased with the results and feel I managed to keep some element of her clear and in focus in all of the pictures.  The first photograph is almost abstract in nature.  While her face is clearly distinguishable the rest of the photograph has taken on the appearance of an oil painting.  As the shutter speed is increased the background is easier to view however the sense of movement is maintained in all of the photographs up to and including the photograph taken at a speed of 1/125th of a second.  After this the photographs look more and more static.  At 1/1000th of a second the subjects look completely static with the only thing giving away movement being the angle of the chains attaching the seat to the swing frame.  One of my personal favourite photographs was taken at 1/125th of a second.  This photograph shows clear movement however one can still distinguish the background relatively clearly.  I also find the photograph taken at 1/15th of a second extremely pleasing due to its abstract nature.  If I had to pick one of the two it would be the one at 1/15th of a second.


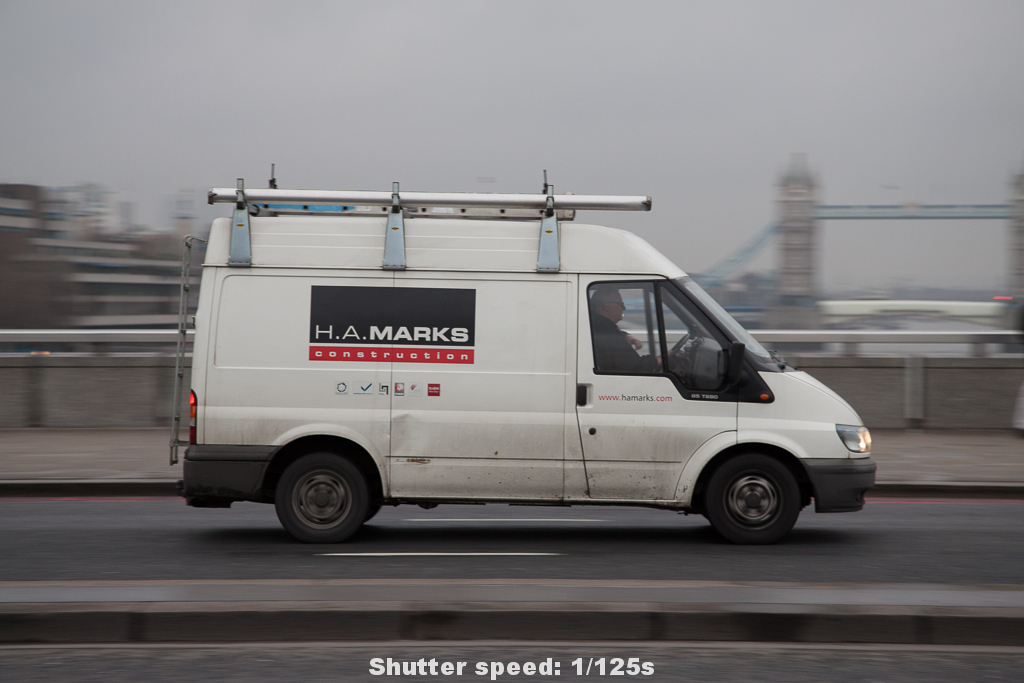
Carrying out this exercise while only worrying about movement in a single plane made panning much easier.  Furthermore, as I was standing quite far from the cars and could see them approaching I was able to set up more easily.  It was an extremely dull day and so in order to achieve the faster shutter speeds I was forced to raise the ISO setting that I used.

Once again the photograph taken at the slowest aperture is almost abstract in nature.  The background is blurred but so is the subject.  This was due to the fact that I found it hard to keep the camera locked on the subject for the duration of the exposure.  However, I feel I did a good enough job of this such that the subject is clearly identifiable as a taxi.  In this first picture the background is completely undistinguishable and it is impossible to tell where this picture was taken.  As the shutter speed is increased one is able to identify the location this picture was taken at for the first time in the shot taken at 1/60th of a second.  By 1/250th of a second there is little motion blur aside from the wheels of the car.  and from 1/500th of a second onwards the movement of the car is completely frozen (including the rotation of the wheels).  My favourite picture in this sequence was taken at 1/60th of a second.  One is able to identify where the picutre was taken and yet the subject is clear and not blurred.  This gives a great feeling of speed to the picture.

Thursday, 24 February 2011

Exercise: Shutter speeds

Adjustments in shutter speed have a direct effect on exposure.  However, changes in the shutter speed also impact the way that moving things in a photograph look.  In this exercise I explore the impact of shutter speed upon the way in which a moving object is recorded in a photograph.

My first task was to find a moving object.  As I stood by the side of a road watching cars drive past me I could not help but think that this subject was less than inspiring.  I took time to come up with some alternatives but real life pressures meant I was unable to explore those ideas at this time.  Thinking outside of the box I realised that movement does not have to be restricted to the horizontal plane.  What I needed was a constantly moving subject that I could record at various shutter speeds and I found this in the form of a water fountain at my local park.

I specifically chose an overcast day.  In order to record images at a long exposure I would have to find some way to reduce the amount of light hitting the sensor of my camera over any given period of time.  Using a small aperture is one way to do this.  Using neutral density filters is another, however I do not currently have any such filters.  An overcast day provided me with the low light levels I needed.  These low light levels would of course have a negative impact on my ability to shoot at high shutter speeds.  I compensated for the low light levels by using the largest aperture possible and increasing the ISO setting of my camera, when shooting at higher shutter speeds.

Results
Below are the photographs I took at various shutter speeds.  The impact on the way in which the moving water is recorded is clear to see. Please note you can click on any of these photographs to see a larger version which is labelled with the shutter speed used.


In order to take these photographs I set my camera up on a tripod in order to keep the framing consistent in each picture.  All images were taken with my Canon 50d camera with a Canon 70-200 f/4 L lens attached.  The image stabilisation mode of the lens was disabled due to the use of a tripod.

I started with a relatively slow shutter speed of 1/2s.  I then continued to take pictures of the scene doubling the shutter speed before taking each picture.  Doubling the shutter speed is the equivalent of reducing the exposure by 1 stop.  To compensate for the reduced amount of light hitting the sensor as I increased the shutter speed I could have increased the aperture by 1 stop each time I doubled the shutter speed.  However, my camera has a mode in which it automatically adjusts aperture to achieve a correct exposure as the user adjusts the shutter speed manually.  This feature is called the shutter priority mode (labelled Tv on the camera) and I decided to utilise this feature.  Each time my camera was unable to increase the aperture any more, due to having reached the maximum aperture of my lens, I would increase the ISO by 1 stop in order to increase the sensitivity of the sensor and to allow me to continue shooting at faster speeds.

The first image taken shows no detail with regards to the individual drops of water or the splash the water makes as it lands back at the base of the fountain.  Instead the water rising and falling has taken on a soft veil like appearance and the water splashing at the bottom of the frame looks  like fog or cotton wool.  In the second photograph the streaks of water are slightly more identifiable.  The rising and falling water appears more like strands of hair than a veil and the splashing water at the base is slightly more distinct.  At 1/15s the rising and falling water is still appearing as streaks however the waves and splashes at the base of the fountain, which are moving more slowly than the rising and falling water, are far more discernible.  At 1/60s the water at the top of the fountain, which is moving more slowly than the water rising and falling, is also starting to become more visible and clear.  In addition to this, separate drops of water are starting to become apparent.  By 1/250s there is very little discernible streaking effect in the picture however the fastest moving water is still slightly blurred.  At 1/500s all but the very fastest and smallest drops of water are clearly visible with no streaking effect.  At 1/1000s and above the water is frozen in time and there is no movement visible in the photograph at all.

My favourite photographs are the first photograph taken, with its veil like almost supernatural look, and the photographs taken at 1/1000s and above where every details of the water can be clearly seen and forms interesting shapes.  Analysing these photographs it has become apparent to me that shutter speed, when the subject is moving, can be manipulated to artistic effect.  Technically each of the photographs I took were correctly exposed however they each portrayed a different story.

Monday, 31 January 2011

Severe disruption to my studies

Not long after I started this course my wife was diagnosed with a chronic illness, lupus.  Side effects from the medication for lupus as well as the illness itself are debilitating and as brave as my wife is it has become physically impossible for her to continue at her usual pace.  In addition to caring for my wife I will be significantly increasing my contribution towards raising our one year old twin daughters.  I thought long and hard about whether it was feasible for me to continue with my studies given the time I will be dedicating to caring for my wife and daughters as well as to my job.  I decided that with discipline and a very strong focus I would be able to carry on with the course.

On Saturday we encountered a further setback.  My wife was taken to the hospital by ambulance and underwent an emergency operation.  Recovery from this operation will take a minimum of six weeks.  During that time my wife will be unable to carry our children or even have them in her lap.

Strawberries for Mummy
At this point I am wondering what else life can throw at me.  It is becoming increasingly hard to get enough sleep, to focus on my work, and to remain optimistic.  I intend to continue with the course dedicating what time I can to it.  However, juggling responsibilities to my employer and to my family is already proving to be challenging.  The rate at which I undertake activities and learning for this course will clearly be severely impacted.

Tuesday, 25 January 2011

Exercise: Shutter speeds - location ideas

I have been wracking my brains to think of a fun and interesting way to carry out the shutter speeds exercise.  I have noticed that most people resort to sitting by the side of a road and capturing cars as they drive past at various speeds.  I am keen to do something different.

Some ideas I have had so far are:
  • sit on a roundabout in a kids playground and photograph the world as I spin around
  • place my camera in a shopping trolley and photograph it being pushed around the supermarket (credit goes to Endre 3000 for this idea http://www.flickr.com/photos/47669578@N07/4861467145/in/photostream/)
  • take photographs of London tubes arriving in to a station using a wide angle lens
  • take photographs while sitting on a swing

I will explore these ideas over the coming days, as time allows.

Exercise: Focus at different apertures

As one varies the aperture used to capture an image there is a discernible variation in the area of the image that lies within the acceptable limits of sharpness.  In this exercise I explored this relationship by taking a photograph of a scene multiple times and varying the aperture each time.

In order to make comparisons on the effect of aperture upon the area of acceptable sharpness within a photograph it was important to capture the same scene multiple times using a variety of apertures.  To achieve ensure that I would be capturing the same scene each time I fixed my camera to a tripod and did not move the camera throughout the exercise.  Variations in the aperture used would require adjustments in the shutter speed to be made in order to achieve the same exposure in each photograph.  I decided to allow the camera to adjust the shutter speed for me and set the camera to aperture priority mode.

I decided to use the trusty wall that I used in the previous exercise.  My reasons for this were in part because I was attracted to the colours and texture within that wall and in part because the wall very clearly demonstrated differences in sharpness across the scene.

Results
In each of the photographs below I have marked boundary of the limits of acceptable sharpness.


In order to capture the above photograph the lens was set to it's widest aperture, f/2.8.  The focus point was set to the middle of the frame and a sample picture was taken.  Upon looking at the histogram on my camera I decided to apply a full stop of exposure compensation and set the camera to record the image in RAW format.  This allowed me to capture a picture without any blown out highlights and which I could confidently underexpose in post processing without introducing noise.  The area of the photograph within the acceptable limits of sharpness is relatively narrow and surrounds the focus point.


In the photograph above I set the camera to a middle of the range aperture, f/8.  The area of the photograph within the acceptable limits of sharpness has grown significantly and is approximately double the size of the first photograph taken.


In the final of the three photographs taken in this series I set the aperture to the smallest available to me, f/22.  One can see that the entire scene from front to back has been rendered within the acceptable limits of sharpness.

Summary
This exercise clearly demonstrated the effect of aperture upon the area of the photograph that is within the acceptable limits of sharpness.  The creative opportunities that this offers the photographer are great.  One can choose to render an entire scene in focus by using a small aperture or one can choose to isolate a subject from other elements within the scene by using a large aperture.  While this is fine for static objects one must consider the effect of changing aperture upon shutter speed.  For example, in order to render the entire scene within the acceptable limits of sharpness the shutter speed had to be increased to 2 seconds whereas at a wide open aperture setting of f/2.8 the shutter speed was only 1/30s.  If the subject had been moving this would have meant that at a wide open aperture one may still have captured a sharp subject.  However at a narrow aperture the subject would have been extremely blurred due to the effect of motion.  In other words, while aperture can be used to capture a photograph with the required area within the acceptable limits of sharpness one must also consider the impact this will have on shutter speed if the camera is hand held or if the subject is moving.