Focal length and angle of view have a direct relationship with one another. In this exercise I explored this relationship. This exercise was carried out at a cemetery close to where I live in Horley, Surrey.
Short Focal Length View
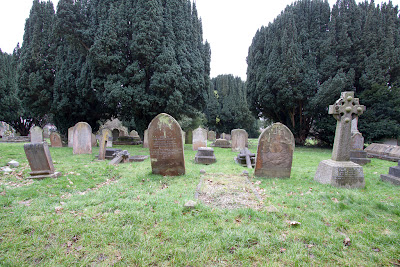
Standard Focal Length View
I attached a 17-55mm zoom lens to the camera and set the focal length to the standard focal length of 46mm which I had previously determined through experimentation. This focal length restricted the angle of view somewhat reducing the number of elements within the photograph. The photograph I took at the 46mm focal length is shown below.

Since the angle of view in this capture is more restricted and one is able to focus more on the headstones themselves. I also noticed that the distance between the objects in this capture appears to be less than capture taken with a shorter focal length. It seems as if the scene is 'compressed' at this longer focal length.
In the wide angle view photograph there are a number of elements competing for the viewers attention such as the sky, the trees and the grass in the foreground. This standard focal length view photograph provides enough of a view for the viewer to immediately know what the subjects within the scene are while removing other non relevant elements that were present in the wide angle view and which in my opinion caused confusion for the viewer. The subjects form an interesting pattern as they are located at varying distances from the camera, are positioned at varying angles and overlap somewhat.
I noticed that the aperture I used was sufficient to keep all elements within the photograph within the limits of acceptable sharpness at a short focal length. However, as the focal length was increased this aperture no longer kept the elements furthest from the focal point, closest to and furthest from viewer, in focus. In retrospect I would have reduced the aperture in order to bring all elements within this photograph in to the limits of acceptable sharpness.
Long Focal Length View
I attached a 70-200mm lens to the camera and set the focal length of the lens to 200mm. This was the longest focal length available to me and resulted in an extremely narrow angle of view. This focal length allowed me to highlight an individual element within the scene. The photograph I captured at the 200mm focal length is shown below.

The extremely narrow angle of view in this capture highlights a single elements from a scene which had a large number of elements within it. One is completely focussed on this element and is able to view the element in a high level of detail. One's attention is completely taken by this single element, the headstone. Since there are no other elements within the photograph to provide context one must focus on the single object itself to determine the context and location within which this photograph was taken. In fact since the main element within this photograph is not entirely within the frame one must go further and look at the detail within this element to determine what it is.
In this photograph the wording upon the headstone goes beyond informing us that this is a headstone in a graveyard. One can see that this headstone has in fact been used for two different people and therefore informs us of a practice of sharing headstones and graves. In fact this grave belongs to a husband and wife who died 16 years apart. Intriguingly this husband was several years younger than his wife, a practice I thought uncommon in England in the 19th century. Questions arise as to why they are sharing a grave? Was this common practice? Was this because they were so in love? Was this because she was too poor to have a grave of her own? In retrospect I should have raised the angle of the camera somewhat to take in more of the detail about the individual described on the top half of the headstone. Looking at this photograph I am left wondering what that persons name was, perhaps this intrigue is a good thing though.
In my observations of the standard focal length view capture I commented on the fact that the acceptable limits of sharpness reduce as the focal length is increased for any given aperture. This is even more apparent in this picture as one can see that the elements immediately in front of and behind the headstone are blurred. I am pleased with this effect. Not only does the narrow angle of view isolate the subject from elements around it but the narrow depth of field isolates the subject from elements in front of and behind it.
Comparing The Human Eye's View With The Prints
Upon printing each of the above photographs on 10"x8" paper I returned to the scene where I took these photographs. Holding the printed photographs in front of me I adjusted the distance of the prints from my eyes such that what i observed in the prints approximated what I observed in real life. There results are shown below:
My initial step was to establish when my camera was set up such that the lens was 'standard' in focal length. The standard view approximates what the human eye sees normally when observing a scene. In order to achieve this I looked through the cameras viewfinder with my right eye and I kept my left eye open. I found that there was a mismatch between the size of the objects being viewed through each eye. I adjusted the focal length of the lens until the objects being observed by both of my eyes were similar in size. Once the objects being viewed by each eye were similar in size I had set my camera up such that the lens was standard in focal length. In my case this occurred when the lens was set to 46mm.
Since the objective of this exercise was to explore the relationship between focal length and angle of view I felt it was important to keep the scene being captured consistent throughout the exercise so as to provide a reference to compare each photograph. I achieved this consistency of scene by mounting my camera on a tripod and ensuring that the camera was not moved between captures. I also realised after a little experimenting that without proper planning it was possible for my photographs to become extremely uninteresting as I increased the focal length and restricted the angle of view. For example, a photograph taken with a short focal length resulting in a wide angle of view takes in a number of subjects and items of interest. Conversely, a photograph taken with a long focal length has an extremely narrow angle of view. It is likely that without proper planning this long focal length photograph may not have had any subjects of interest in it. With this in mind I composed these photographs with the longest focal length first to ensure there was a subject of interest in the frame. I then set my camera to the shortest focal length available to me, again to ensure that I had a photograph of some interest.
Short Focal Length View
I attached a 10-22mm zoom lens to my camera and set the focal length to 10mm. This was the shortest focal length available to me and resulted in the widest angle of view. The photograph I took at the 10mm focal length is shown below.

Due to the wide angle of view this photograph contains a number of subjects that could potentially be of interest. These subjects are shown in the context of their location and it is immediately obvious what kind of location this photograph was taken at. However there are elements within the composition that are distracting and not particularly relevant to the scene. These elements include the uninteresting grass in the foreground and the very bright blown-out sky. I would have preferred to have taken this photograph from a much lower height to try and eliminate the sky and with something of interest in the foreground. However, doing so would have meant that the photograph taken with the longest focal length would have been rather uninteresting as it would have been obscured by any subject close to the camera. I decided to compromise and raise the height of the camera. I tried to eliminate as much of the sky as possible by composing a scene with trees in it and by angling the camera down somewhat. With more time I would have waited for a day with a more dramatic cloudy sky to provide some interest or on a sunny day with a pleasant sky to look at and sun to cast shadows from the headstones.
Standard Focal Length View
I attached a 17-55mm zoom lens to the camera and set the focal length to the standard focal length of 46mm which I had previously determined through experimentation. This focal length restricted the angle of view somewhat reducing the number of elements within the photograph. The photograph I took at the 46mm focal length is shown below.

Since the angle of view in this capture is more restricted and one is able to focus more on the headstones themselves. I also noticed that the distance between the objects in this capture appears to be less than capture taken with a shorter focal length. It seems as if the scene is 'compressed' at this longer focal length.
In the wide angle view photograph there are a number of elements competing for the viewers attention such as the sky, the trees and the grass in the foreground. This standard focal length view photograph provides enough of a view for the viewer to immediately know what the subjects within the scene are while removing other non relevant elements that were present in the wide angle view and which in my opinion caused confusion for the viewer. The subjects form an interesting pattern as they are located at varying distances from the camera, are positioned at varying angles and overlap somewhat.
I noticed that the aperture I used was sufficient to keep all elements within the photograph within the limits of acceptable sharpness at a short focal length. However, as the focal length was increased this aperture no longer kept the elements furthest from the focal point, closest to and furthest from viewer, in focus. In retrospect I would have reduced the aperture in order to bring all elements within this photograph in to the limits of acceptable sharpness.
Long Focal Length View
I attached a 70-200mm lens to the camera and set the focal length of the lens to 200mm. This was the longest focal length available to me and resulted in an extremely narrow angle of view. This focal length allowed me to highlight an individual element within the scene. The photograph I captured at the 200mm focal length is shown below.

In this photograph the wording upon the headstone goes beyond informing us that this is a headstone in a graveyard. One can see that this headstone has in fact been used for two different people and therefore informs us of a practice of sharing headstones and graves. In fact this grave belongs to a husband and wife who died 16 years apart. Intriguingly this husband was several years younger than his wife, a practice I thought uncommon in England in the 19th century. Questions arise as to why they are sharing a grave? Was this common practice? Was this because they were so in love? Was this because she was too poor to have a grave of her own? In retrospect I should have raised the angle of the camera somewhat to take in more of the detail about the individual described on the top half of the headstone. Looking at this photograph I am left wondering what that persons name was, perhaps this intrigue is a good thing though.
In my observations of the standard focal length view capture I commented on the fact that the acceptable limits of sharpness reduce as the focal length is increased for any given aperture. This is even more apparent in this picture as one can see that the elements immediately in front of and behind the headstone are blurred. I am pleased with this effect. Not only does the narrow angle of view isolate the subject from elements around it but the narrow depth of field isolates the subject from elements in front of and behind it.
Comparing The Human Eye's View With The Prints
Upon printing each of the above photographs on 10"x8" paper I returned to the scene where I took these photographs. Holding the printed photographs in front of me I adjusted the distance of the prints from my eyes such that what i observed in the prints approximated what I observed in real life. There results are shown below:
- 10mm short focal length, wide angle of view: I had to bring the print as close to my eyes as possible in order to approximate the real world view.
- 46mm standard focal length: I had to hold the print at around arms length to approximate the real world view. I am estimating the distance was between 40 and 50cm.
- 200mm long focal lenth, narrow angle of view: I had to position the photograph relatively far from my eyes to approximate the real world view. I achieved this by attaching the print to my tripod. I estimate the distance was in the region of 1.5m.
Summary
I approached this exercise with some prior knowledge of the relationship between focal length and angle of view. However, the impact of this relationship did not really hit home until I actually carried out the exercise and observed the results analytically. I feel that having carried out this exercise I have a much better grasp of the impact of focal length and angle of view upon the story that my photographs paint. I am now concious of the relationship between focal length, angle of view and what my eyes see in the real world. I learned that the aperture required in order to maintain the acceptable limits of sharpness within a scene must be reduced as the focal length is increased. In addition to this this I was able to observe the compression of the scene that increasing focal length brings about, something I had read about but not properly understood in the past.
No comments:
Post a Comment