Showing posts with label Introduction. Show all posts

Sunday, 13 March 2011

Exercise: Panning with different shutter speeds

Panning involves following the movement of a subject with the camera. A fast shutter speed can freeze motion while a slow shutter speed can result in an exposure in which the movement of the subject is apparent.

For this exercise I once again strived to pick a subject out of the norm. I decided to elicit the help of my twins and photographed one of them as she flew past me on a swing.  I also decided to try the exercise on passing cars.  My primary reason for doing this was to have one set of photographs where the movement was in a single direction.

Results
In order to take these photographs I set my camera to the Shutter Priority mode (Tv) and allowed the camera to choose the aperture needed to correctly expose the picture. All photographs were taken with my Canon 50d camera body with the Canon 17-55 2.8 IS lens attached.  Please click on any of these photographs in order to see a larger version.  Each photograph is labelled with the associated exposure settings and this is far easier to read on the enlarged view of the photographs.


Capturing my daughter as she hurtled past on a swing was challenging.  The movement I had to track was an arc.  I had to be close to her in order to prevent the frame of the swing obstructing my view and this meant that the movement was also rather fast.  It was a cold day and so I could not afford to spend too much time shooting for a perfect capture.

I am extremely pleased with the results and feel I managed to keep some element of her clear and in focus in all of the pictures.  The first photograph is almost abstract in nature.  While her face is clearly distinguishable the rest of the photograph has taken on the appearance of an oil painting.  As the shutter speed is increased the background is easier to view however the sense of movement is maintained in all of the photographs up to and including the photograph taken at a speed of 1/125th of a second.  After this the photographs look more and more static.  At 1/1000th of a second the subjects look completely static with the only thing giving away movement being the angle of the chains attaching the seat to the swing frame.  One of my personal favourite photographs was taken at 1/125th of a second.  This photograph shows clear movement however one can still distinguish the background relatively clearly.  I also find the photograph taken at 1/15th of a second extremely pleasing due to its abstract nature.  If I had to pick one of the two it would be the one at 1/15th of a second.


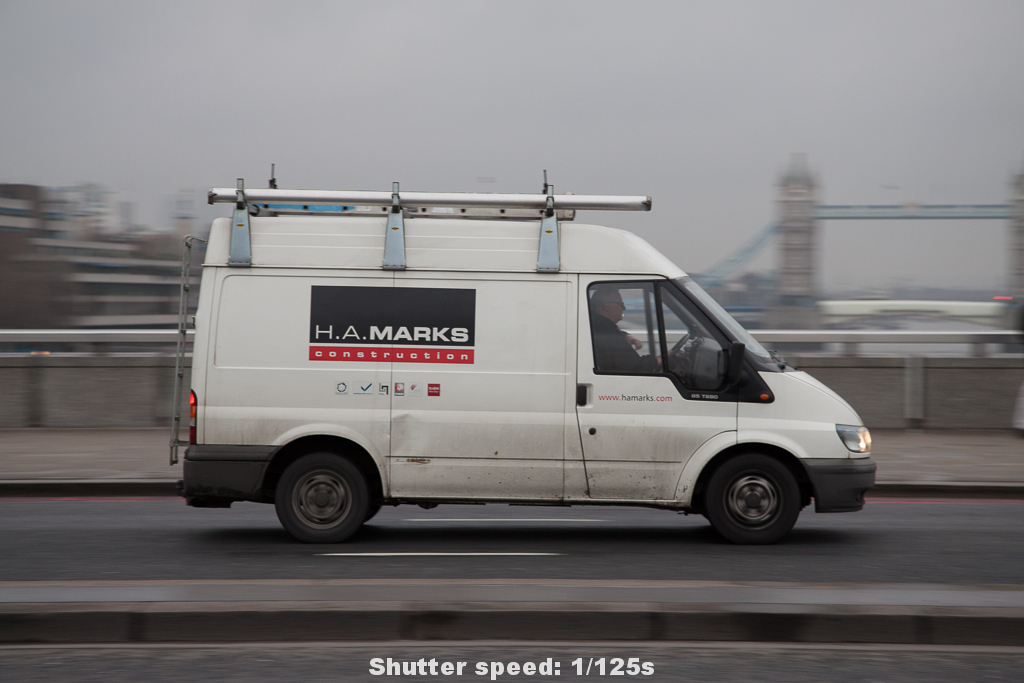
Carrying out this exercise while only worrying about movement in a single plane made panning much easier.  Furthermore, as I was standing quite far from the cars and could see them approaching I was able to set up more easily.  It was an extremely dull day and so in order to achieve the faster shutter speeds I was forced to raise the ISO setting that I used.

Once again the photograph taken at the slowest aperture is almost abstract in nature.  The background is blurred but so is the subject.  This was due to the fact that I found it hard to keep the camera locked on the subject for the duration of the exposure.  However, I feel I did a good enough job of this such that the subject is clearly identifiable as a taxi.  In this first picture the background is completely undistinguishable and it is impossible to tell where this picture was taken.  As the shutter speed is increased one is able to identify the location this picture was taken at for the first time in the shot taken at 1/60th of a second.  By 1/250th of a second there is little motion blur aside from the wheels of the car.  and from 1/500th of a second onwards the movement of the car is completely frozen (including the rotation of the wheels).  My favourite picture in this sequence was taken at 1/60th of a second.  One is able to identify where the picutre was taken and yet the subject is clear and not blurred.  This gives a great feeling of speed to the picture.

Thursday, 24 February 2011

Exercise: Shutter speeds

Adjustments in shutter speed have a direct effect on exposure.  However, changes in the shutter speed also impact the way that moving things in a photograph look.  In this exercise I explore the impact of shutter speed upon the way in which a moving object is recorded in a photograph.

My first task was to find a moving object.  As I stood by the side of a road watching cars drive past me I could not help but think that this subject was less than inspiring.  I took time to come up with some alternatives but real life pressures meant I was unable to explore those ideas at this time.  Thinking outside of the box I realised that movement does not have to be restricted to the horizontal plane.  What I needed was a constantly moving subject that I could record at various shutter speeds and I found this in the form of a water fountain at my local park.

I specifically chose an overcast day.  In order to record images at a long exposure I would have to find some way to reduce the amount of light hitting the sensor of my camera over any given period of time.  Using a small aperture is one way to do this.  Using neutral density filters is another, however I do not currently have any such filters.  An overcast day provided me with the low light levels I needed.  These low light levels would of course have a negative impact on my ability to shoot at high shutter speeds.  I compensated for the low light levels by using the largest aperture possible and increasing the ISO setting of my camera, when shooting at higher shutter speeds.

Results
Below are the photographs I took at various shutter speeds.  The impact on the way in which the moving water is recorded is clear to see. Please note you can click on any of these photographs to see a larger version which is labelled with the shutter speed used.


In order to take these photographs I set my camera up on a tripod in order to keep the framing consistent in each picture.  All images were taken with my Canon 50d camera with a Canon 70-200 f/4 L lens attached.  The image stabilisation mode of the lens was disabled due to the use of a tripod.

I started with a relatively slow shutter speed of 1/2s.  I then continued to take pictures of the scene doubling the shutter speed before taking each picture.  Doubling the shutter speed is the equivalent of reducing the exposure by 1 stop.  To compensate for the reduced amount of light hitting the sensor as I increased the shutter speed I could have increased the aperture by 1 stop each time I doubled the shutter speed.  However, my camera has a mode in which it automatically adjusts aperture to achieve a correct exposure as the user adjusts the shutter speed manually.  This feature is called the shutter priority mode (labelled Tv on the camera) and I decided to utilise this feature.  Each time my camera was unable to increase the aperture any more, due to having reached the maximum aperture of my lens, I would increase the ISO by 1 stop in order to increase the sensitivity of the sensor and to allow me to continue shooting at faster speeds.

The first image taken shows no detail with regards to the individual drops of water or the splash the water makes as it lands back at the base of the fountain.  Instead the water rising and falling has taken on a soft veil like appearance and the water splashing at the bottom of the frame looks  like fog or cotton wool.  In the second photograph the streaks of water are slightly more identifiable.  The rising and falling water appears more like strands of hair than a veil and the splashing water at the base is slightly more distinct.  At 1/15s the rising and falling water is still appearing as streaks however the waves and splashes at the base of the fountain, which are moving more slowly than the rising and falling water, are far more discernible.  At 1/60s the water at the top of the fountain, which is moving more slowly than the water rising and falling, is also starting to become more visible and clear.  In addition to this, separate drops of water are starting to become apparent.  By 1/250s there is very little discernible streaking effect in the picture however the fastest moving water is still slightly blurred.  At 1/500s all but the very fastest and smallest drops of water are clearly visible with no streaking effect.  At 1/1000s and above the water is frozen in time and there is no movement visible in the photograph at all.

My favourite photographs are the first photograph taken, with its veil like almost supernatural look, and the photographs taken at 1/1000s and above where every details of the water can be clearly seen and forms interesting shapes.  Analysing these photographs it has become apparent to me that shutter speed, when the subject is moving, can be manipulated to artistic effect.  Technically each of the photographs I took were correctly exposed however they each portrayed a different story.

Tuesday, 25 January 2011

Exercise: Shutter speeds - location ideas

I have been wracking my brains to think of a fun and interesting way to carry out the shutter speeds exercise.  I have noticed that most people resort to sitting by the side of a road and capturing cars as they drive past at various speeds.  I am keen to do something different.

Some ideas I have had so far are:
  • sit on a roundabout in a kids playground and photograph the world as I spin around
  • place my camera in a shopping trolley and photograph it being pushed around the supermarket (credit goes to Endre 3000 for this idea http://www.flickr.com/photos/47669578@N07/4861467145/in/photostream/)
  • take photographs of London tubes arriving in to a station using a wide angle lens
  • take photographs while sitting on a swing

I will explore these ideas over the coming days, as time allows.

Exercise: Focus at different apertures

As one varies the aperture used to capture an image there is a discernible variation in the area of the image that lies within the acceptable limits of sharpness.  In this exercise I explored this relationship by taking a photograph of a scene multiple times and varying the aperture each time.

In order to make comparisons on the effect of aperture upon the area of acceptable sharpness within a photograph it was important to capture the same scene multiple times using a variety of apertures.  To achieve ensure that I would be capturing the same scene each time I fixed my camera to a tripod and did not move the camera throughout the exercise.  Variations in the aperture used would require adjustments in the shutter speed to be made in order to achieve the same exposure in each photograph.  I decided to allow the camera to adjust the shutter speed for me and set the camera to aperture priority mode.

I decided to use the trusty wall that I used in the previous exercise.  My reasons for this were in part because I was attracted to the colours and texture within that wall and in part because the wall very clearly demonstrated differences in sharpness across the scene.

Results
In each of the photographs below I have marked boundary of the limits of acceptable sharpness.


In order to capture the above photograph the lens was set to it's widest aperture, f/2.8.  The focus point was set to the middle of the frame and a sample picture was taken.  Upon looking at the histogram on my camera I decided to apply a full stop of exposure compensation and set the camera to record the image in RAW format.  This allowed me to capture a picture without any blown out highlights and which I could confidently underexpose in post processing without introducing noise.  The area of the photograph within the acceptable limits of sharpness is relatively narrow and surrounds the focus point.


In the photograph above I set the camera to a middle of the range aperture, f/8.  The area of the photograph within the acceptable limits of sharpness has grown significantly and is approximately double the size of the first photograph taken.


In the final of the three photographs taken in this series I set the aperture to the smallest available to me, f/22.  One can see that the entire scene from front to back has been rendered within the acceptable limits of sharpness.

Summary
This exercise clearly demonstrated the effect of aperture upon the area of the photograph that is within the acceptable limits of sharpness.  The creative opportunities that this offers the photographer are great.  One can choose to render an entire scene in focus by using a small aperture or one can choose to isolate a subject from other elements within the scene by using a large aperture.  While this is fine for static objects one must consider the effect of changing aperture upon shutter speed.  For example, in order to render the entire scene within the acceptable limits of sharpness the shutter speed had to be increased to 2 seconds whereas at a wide open aperture setting of f/2.8 the shutter speed was only 1/30s.  If the subject had been moving this would have meant that at a wide open aperture one may still have captured a sharp subject.  However at a narrow aperture the subject would have been extremely blurred due to the effect of motion.  In other words, while aperture can be used to capture a photograph with the required area within the acceptable limits of sharpness one must also consider the impact this will have on shutter speed if the camera is hand held or if the subject is moving.

Exercise: Focus with a set aperture

Depth within a picture, from foreground to background, represents an opportunity for the photographer to make creative choices. It is possible for the photographer to draw attention to specific elements within the scene via the use of differential focus. Alternatively the photographer may choose to bring more elements in to focus in order to tell a story for example. A combination of aperture, focal length and focus point can be used to make these creative choices.

In this exercise I explore the effect of choosing different focus points within a scene in combination with a large aperture. A large aperture produces a photograph in which a shallow area is within the limits of acceptable sharpness. The area of the photograph within the limits of acceptable sharpness surrounds the focus point chosen or the element within the scene which was used to focus the lens.

I decided to carry out this exercise in the same location as the previous exercise. This exercise required a scene with depth. I noticed a row of headstones which were aesthetically pleasing and which satisfied this requirement for depth. Choosing a viewpoint at an acute angle to the row of headstones I fixed the camera to a tripod and attached a 17-55mm zoom lens to the camera. I chose this particular lens due to its ability to work at a reltively large aperture of f/2.8. This exercise required me to compose a scene and then to take three photographs varying only the focal point between the photographs. The camera was set to aperture priority mode so that i could manipulate the aperture as required and allow the camera to determine the shutter speed required to create a correct expoaure. I found the exposure the camera created to be a little dull and so I adjusted this by increasing exposure compensation. Upon setting the lens to its largest aperture, f/2.8, I composed the scene and shot the photograph using a shutter release cable in order to minimize the chance of camera shake. The photographs I captured are shown below.

Results


In this first image the headstone nearest to the camera and to the left of the other headstones is in focus. I chose the nearest headstone as the focus point for this photograph by selecting a focus point in the cameras live view mode. Live view mode allows for extremely granular focus point selection. Normal operation of the camera requires one to choose from one of only 9 focus points on my camera, the Canon 50d. In live view I was able to specifically choose which headstone i wanted to have in focus without having to focus and recompose the scene which would have risked changing the scene between the different photographs. In the above photograph one can see that while the nearest headstone is in focus the other headstones, which are increasingly further away from the camera, rapidly become out of focus.


In the photograph above I moved the focus point within the camera to the second headstone along. The selected headstone is clearly within the acceptable limits of sharpness while the headstone closer to the camera and everything further from the camera are out of focus. However it should be noted that the elements within the scene that are further away from the lens than the focus point are much sharper than in the first photograph.


In the final photograph in this series the third headstone is seleced as the focus point. Once again the nearest headstone is out of focus. The second headstone is slightly out of focus and the third headstone is in focus. The other headtones further away from the lens than the focus point as well as the church in the background are far clearer than any of the previous photographs,

Summary
It is apparent that the depth of field that is within the limits of acceptable sharpness increases as the focus point is located further from the lens. While i was aware of this behaviour I had not realised how dramatic this effect is. Comparing the first and third photographs one can see that for a relatively small change of distance of the focus point from the lens the church which is far in the background becomes dramatically more in focus. My favourite photograph of these three is the second one. The reason for this is due to the fact that the other headstones and the background in general are out of focus and this draws ones eye to the headstone that has been selected as the focus point. This allows the viewer to concentrate on the chosen point without distraction.

Had I captured the first headstone in it's entirety the first photograph would have been my favourite as in that capture the other headstones and the background are the most out of focus. This really draws ones eye to the intended subject, the first headstone. In retrospect were I to take these photographs again I would make two changes.  I would compose the scene such that the nearest subject is within the frame rather than a small part of it. Secondly I would choose a composition where the third element was more in view. In the scene above the third headstone is at such an acute angle to the lens that it is not properly visible and therefore does not demonstrate the effects required by this exercise as effectively as possible.

Addendum
As I walked round the graveyard I was thinking about the relationship between the depth of the area of the photographs with an acceptable level of sharpness and the distance of the focus point from the lens. I realised that if more distant focus points result in a larger depth of acceptable sharpness then closer focus points would have a much shallower depth of acceptable sharpness demonstrating the effect of a large aperture on depth of field more clearly. I also considered the fact that a continuous subject extending in to the scene away from the lens would more clearly demonstrate what I had observed during this exercise so I set about looking for a suitable subject.

As I stopped to think about where I might find a suitable subject I realised that I was leaning against it! The wall behind me had wonderful colours and an interesting texture which I found aesthetically pleasing and interesting. Furthermore, the continuous nature of the wall meant that it would provide a great subject to demonstrate the points within this exercise upon. Finally, I was sure to position myself close to the wall to decrease the depth of field within the acceptable limits of sharpness, thereby demonstrating the effects of a large aperture more effectively and also producing a pleasing photograph full of beautiful bokeh.


In this first of three photographs I positioned the focus point to be as far to the left of the scene as possible and therefore at the nearest part of the wall. One can see the closest part of the wall is in sharp focus while other parts of the wall which are further away rapidly fall out focus.


In the photograph above I moved the focus point to the centre of the scene. Much more of the scene is in focus than the first photograph. However, the closest parts of the capture are out of focus as are the most distant parts. The continuous nature of the wall clearly shows how the depth of field within the acceptable limits of sharpness has increased as the focus point is moved further away from the lens.


For this final photograph in this series I set the focus point to be as far to the right as possible. One can see that much of the wall is in focus while the areas of the wall furthest from the focus point and closest to the lens are out of focus, as expected.

My favourite photograph within this series, and overall in fact, is the first photograph of the wall, with the focus point to the left of the scene and close to the camera. I enjoyed this photograph greatly because of the wonderful colour and texture in the wall. I also found the fact that the further parts of the wall were out of focus pulled my eyes back to the in focus area where I could concentrate on those colours and textures. The second and third pictures of the wall were not aesthetically pleasing for me. This was primarily because the areas of the wall that were in focus were far away and the textures could not be easily seen as they were small. Furthermore I found the large out of focus area to the left rather distracting as the in focus elements were unable to hold my attention.

Monday, 24 January 2011

Exercise: Focal length and angle of view - Results

Focal length and angle of view have a direct relationship with one another.  In this exercise I explored this relationship.  This exercise was carried out at a cemetery close to where I live in Horley, Surrey.

My initial step was to establish when my camera was set up such that the lens was 'standard' in focal length.  The standard view approximates what the human eye sees normally when observing a scene.  In order to achieve this I looked through the cameras viewfinder with my right eye and I kept my left eye open.  I found that there was a mismatch between the size of the objects being viewed through each eye.  I adjusted the focal length of the lens until the objects being observed by both of my eyes were similar in size.  Once the objects being viewed by each eye were similar in size I had set my camera up such that the lens was standard in focal length.  In my case this occurred when the lens was set to 46mm.

Since the objective of this exercise was to explore the relationship between focal length and angle of view I felt it was important to keep the scene being captured consistent throughout the exercise so as to provide a reference to compare each photograph.  I achieved this consistency of scene by mounting my camera on a tripod and ensuring that the camera was not moved between captures.  I also realised after a little experimenting that without proper planning it was possible for my photographs to become extremely uninteresting as I increased the focal length and restricted the angle of view.  For example, a photograph taken with a short focal length resulting in a wide angle of view takes in a number of subjects and items of interest.  Conversely, a photograph taken with a long focal length has an extremely narrow angle of view.  It is likely that without proper planning this long focal length photograph may not have had any subjects of interest in it.  With this in mind I composed these photographs with the longest focal length first to ensure there was a subject of interest in the frame.  I then set my camera to the shortest focal length available to me, again to ensure that I had a photograph of some interest.

Short Focal Length View
I attached a 10-22mm zoom lens to my camera and set the focal length to 10mm.  This was the shortest focal length available to me and resulted in the widest angle of view.  The photograph I took at the 10mm focal length is shown below.


Due to the wide angle of view this photograph contains a number of subjects that could potentially be of interest.  These subjects are shown in the context of their location and it is immediately obvious what kind of location this photograph was taken at.  However there are elements within the composition that are distracting and not particularly relevant to the scene.  These elements include the uninteresting grass in the foreground and the very bright blown-out sky.  I would have preferred to have taken this photograph from a much lower height to try and eliminate the sky and with something of interest in the foreground.  However, doing so would have meant that the photograph taken with the longest focal length would have been rather uninteresting as it would have been obscured by any subject close to the camera.  I decided to compromise and raise the height of the camera.  I tried to eliminate as much of the sky as possible by composing a scene with trees in it and by angling the camera down somewhat.  With more time I would have waited for a day with a more dramatic cloudy sky to provide some interest or on a sunny day with a pleasant sky to look at and sun to cast shadows from the headstones.

Standard Focal Length View
I attached a 17-55mm zoom lens to the camera and set the focal length to the standard focal length of 46mm which I had previously determined through experimentation.  This focal length restricted the angle of view somewhat reducing the number of elements within the photograph.  The photograph I took at the 46mm focal length is shown below.


Since the angle of view in this capture is more restricted and one is able to focus more on the headstones themselves.  I also noticed that the distance between the objects in this capture appears to be less than capture taken with a shorter focal length.  It seems as if the scene is 'compressed' at this longer focal length.

In the wide angle view photograph there are a number of elements competing for the viewers attention such as the sky, the trees and the grass in the foreground.  This standard focal length view photograph provides enough of a view for the viewer to immediately know what the subjects within the scene are while removing other non relevant elements that were present in the wide angle view and which in my opinion caused confusion for the viewer.  The subjects form an interesting pattern as they are located at varying distances from the camera, are positioned at varying angles and overlap somewhat.

I noticed that the aperture I used was sufficient to keep all elements within the photograph within the limits of acceptable sharpness at a short focal length.  However, as the focal length was increased this aperture no longer kept the elements furthest from the focal point, closest to and furthest from viewer, in focus.  In retrospect I would have reduced the aperture in order to bring all elements within this photograph in to the limits of acceptable sharpness.

Long Focal Length View
I attached a 70-200mm lens to the camera and set the focal length of the lens to 200mm.  This was the longest focal length available to me and resulted in an extremely narrow angle of view.  This focal length allowed me to highlight an individual element within the scene.  The photograph I captured at the 200mm focal length is shown below.


The extremely narrow angle of view in this capture highlights a single elements from a scene which had a large number of elements within it.  One is completely focussed on this element and is able to view the element in a high level of detail.  One's attention is completely taken by this single element, the headstone.  Since there are no other elements within the photograph to provide context one must focus on the single object itself to determine the context and location within which this photograph was taken.  In fact since the main element within this photograph is not entirely within the frame one must go further and look at the detail within this element to determine what it is.

In this photograph the wording upon the headstone goes beyond informing us that this is a headstone in a graveyard.  One can see that this headstone has in fact been used for two different people and therefore informs us of a practice of sharing headstones and graves.  In fact this grave belongs to a husband and wife who died 16 years apart.  Intriguingly this husband was several years younger than his wife, a practice I thought uncommon in England in the 19th century.  Questions arise as to why they are sharing a grave?  Was this common practice?  Was this because they were so in love?  Was this because she was too poor to have a grave of her own?  In retrospect I should have raised the angle of the camera somewhat to take in more of the detail about the individual described on the top half of the headstone.  Looking at this photograph I am left wondering what that persons name was, perhaps this intrigue is a good thing though.

In my observations of the standard focal length view capture I commented on the fact that the acceptable limits of sharpness reduce as the focal length is increased for any given aperture.  This is even more apparent in this picture as one can see that the elements immediately in front of and behind the headstone are blurred.  I am pleased with this effect.  Not only does the narrow angle of view isolate the subject from elements around it but the narrow depth of field isolates the subject from elements in front of and behind it.

Comparing The Human Eye's View With The Prints
Upon printing each of the above photographs on 10"x8" paper I returned to the scene where I took these photographs.  Holding the printed photographs in front of me I adjusted the distance of the prints from my eyes such that what i observed in the prints approximated what I observed in real life.  There results are shown below:

  • 10mm short focal length, wide angle of view: I had to bring the print as close to my eyes as possible in order to approximate the real world view.  
  • 46mm standard focal length: I had to hold the print at around arms length to approximate the real world view.  I am estimating the distance was between 40 and 50cm.
  • 200mm long focal lenth, narrow angle of view: I had to position the photograph relatively far from my eyes to approximate the real world view.  I achieved this by attaching the print to my tripod.  I estimate the distance was in the region of 1.5m.
Summary
I approached this exercise with some prior knowledge of the relationship between focal length and angle of view.  However, the impact of this relationship did not really hit home until I actually carried out the exercise and observed the results analytically.  I feel that having carried out this exercise I have a much better grasp of the impact of focal length and angle of view upon the story that my photographs paint.  I am now concious of the relationship between focal length, angle of view and what my eyes see in the real world.  I learned that the aperture required in order to maintain the acceptable limits of sharpness within a scene must be reduced as the focal length is increased.  In addition to this this I was able to observe the compression of the scene that increasing focal length brings about, something I had read about but not properly understood in the past.


Sunday, 23 January 2011

Exercise: Focal length and angle of view - Location idea

I have been thinking all day about locations where I can carry out Exercise 1, Focal Length and Angle of View. I resorted to driving around in my car scouting for locations, with no luck. This evening I realised that Flickr could provide me with some inspiration and so I browsed the wide angle Canon 10-22mm lens group for some time.

Taking in to consideration the very flat light produced by the dull grey clouds that are covering the skies in my area these days I have decided that a graveyard would be an excellent location for this exercise. I am also considering processing my images as black and white as I believe this would work well in a graveyard with flat lighting.

I will head out to my nearest graveyard tomorrow, family commitments permitting, being careful to avoid church service times as it will be Sunday.